The Connect App is available for iOS and Android platforms.


The Connect App is available for iOS and Android platforms.
![]()
![]()
![]()
![]()
For further information please Contact Us
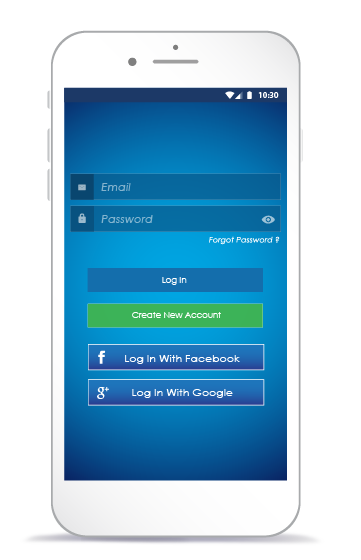
You MUST create a new account to log into the Connect app.
If you have already created a Connect account you can jump to Step 4.
If you are already connected to an account, please skip to Step 4.
Note: Multiple people can use the same account by sharing the login information after setup is complete. Once your account is created you must ALWAYS use the same login method. For example, if you login with google, you must always login with google. If you later attempt to login with your google email through the email and password option, you will create an entirely separate account that is not linked to your thermostats.
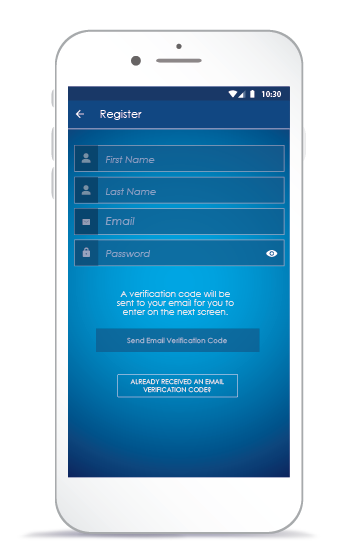
After completing the required fields you will receive an email containing a verification code which is required to complete the next step.
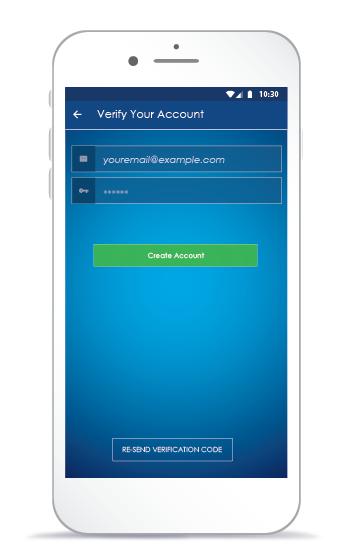
Now enter the verification code from the email and select Create Account.
Note: If you did not receive an email please check your junk folder. If you return back to this screen after selecting Create New Account, press Login.
Now that you have an account it is time to connect your thermostat to your local WIFI network.
Select Add A Thermostat button to add a thermostat to your account.

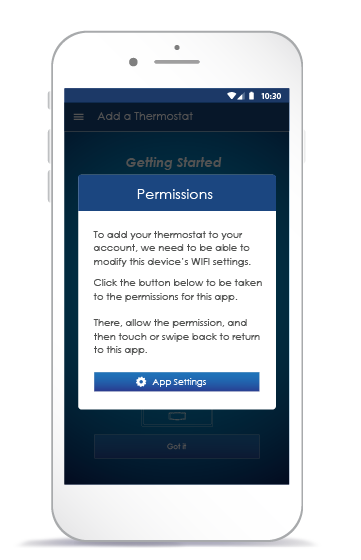
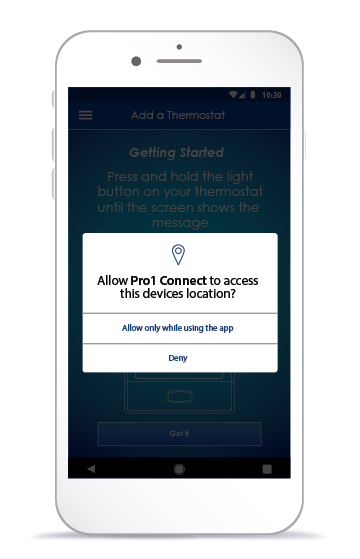
To add a new thermostat to your account, you must enable “Location” permissions for this application so we can detect when you have connected to your new thermostat’s WIFI. Click the App Settings button below, select Permissions” option, and enable “Location” permissions.
Select your local WIFI network from the drop-down list and enter the password. Press “Continue”.
Note: On an Android device you must disable mobile data through the phone settings in order to reach this step.
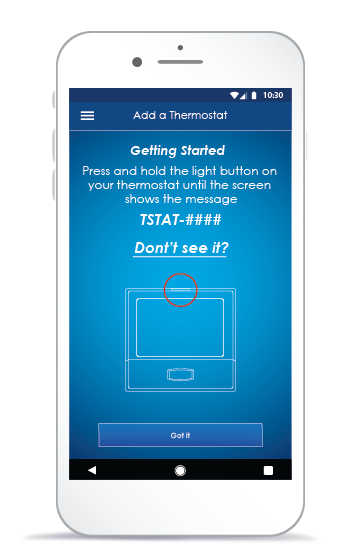
Press and hold the light button on your thermostat until the backlight flashes 3 times and the thermostat’s network appears on the thermostat screen. It will begin with “TSTAT”. Then press the Got It button.
Note: When using an Android phone press the lower right back button to return to this screen.
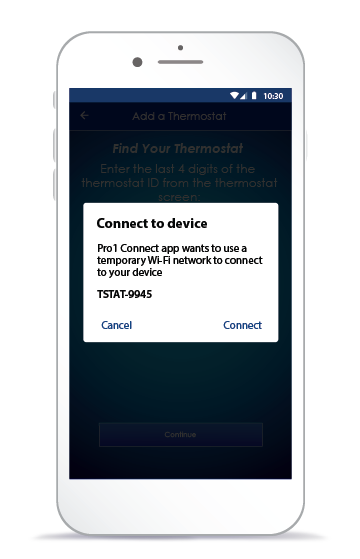
The Connect App needs to connect to thermostat’s WIFI network. Press “Join” to continue.
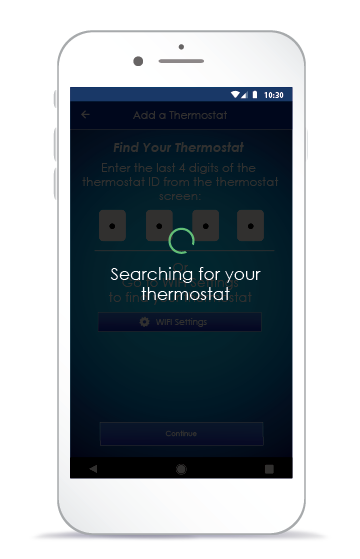
The Connect app will automatically search for your thermostat.
Note: If there are multiple thermostats waiting to be connected, you will have an option to enter the four-digit network ID. (The 4 numbers that follow “TSTAT”) Press Continue.
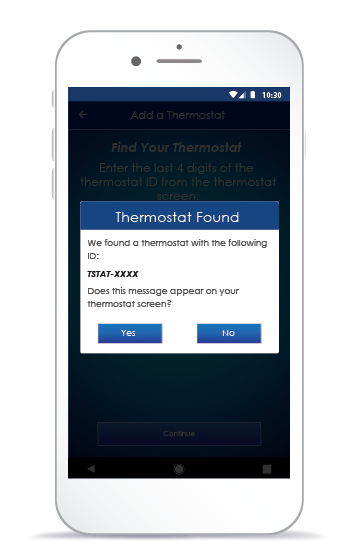
When your thermostat is found the app will display the 4 digit code. If this code matches the code on your thermostat screen press Yes.
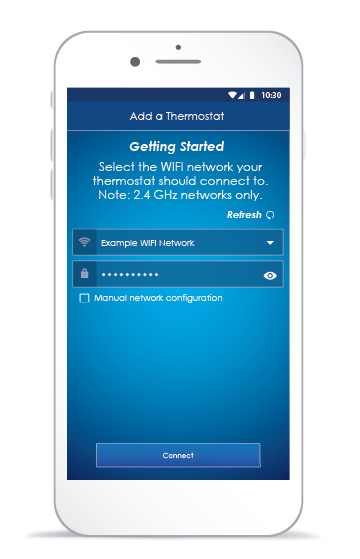
Enter your WIFI network and password. If the desired WIFI network does not appear users can manually configure the network.
Note: 2.4 GHz networks only. Password is case sensitive. If the desired WIFI network does not appear, you can manually configure the network but selecting the box.
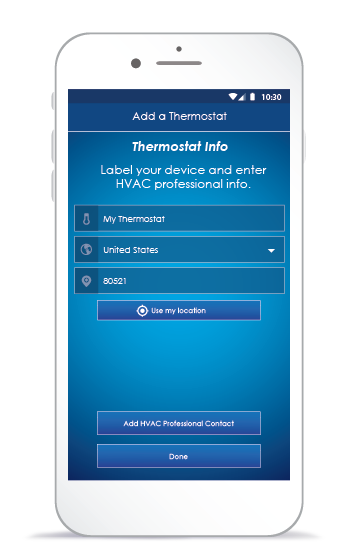
Name and enter the location of the thermostat that you are connecting.

Before completing the process, you have the option to enter the contact information of your trusted HVAC professional. This will be stored throughout the app for quick access whenever your system requires servicing.
Now that you have an account it is time to connect your thermostat to your local WIFI network.
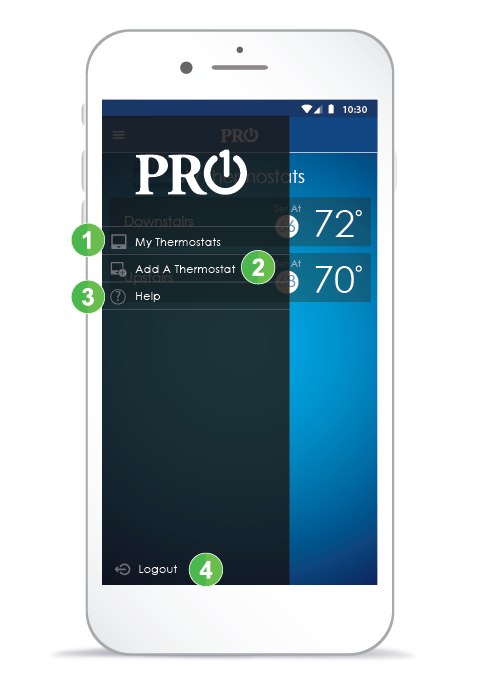
Access Help, Add a Thermostat, and more.
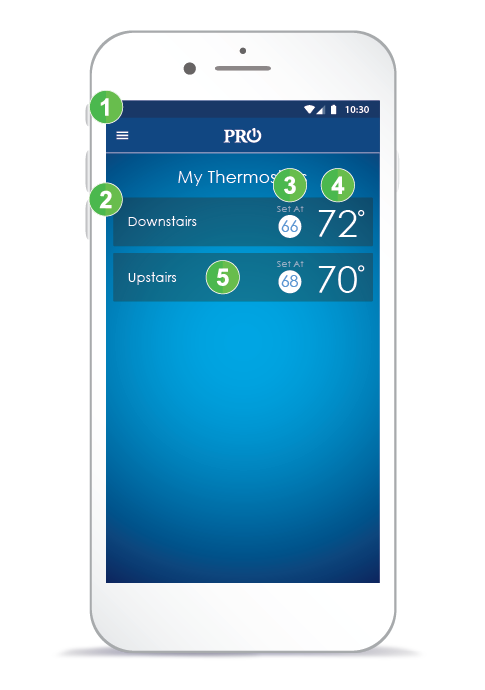
View and select all thermostats registered to your account.
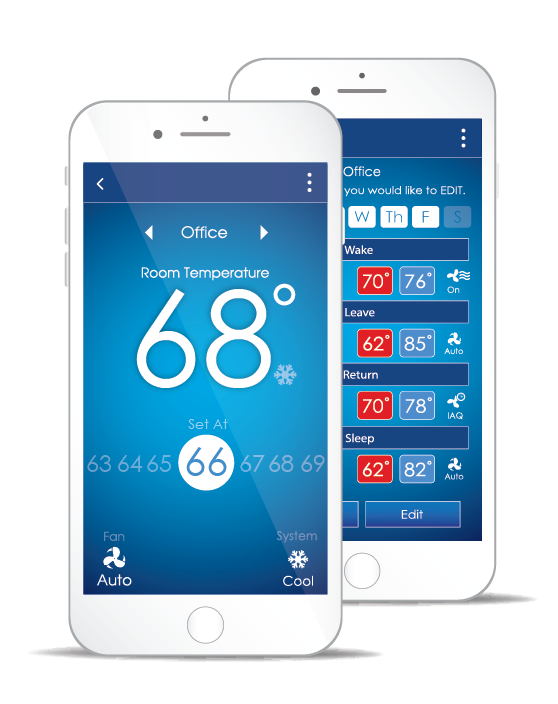
This number displays the current Set At temperature for the listed thermostat. Red indicates the system is currently in heat and blue indicates cooling. It the system is in auto-changeover both will appear.
This number displays the current ambient room temperature for each thermostat.
Select a thermostat to advance to the thermostat control screen.
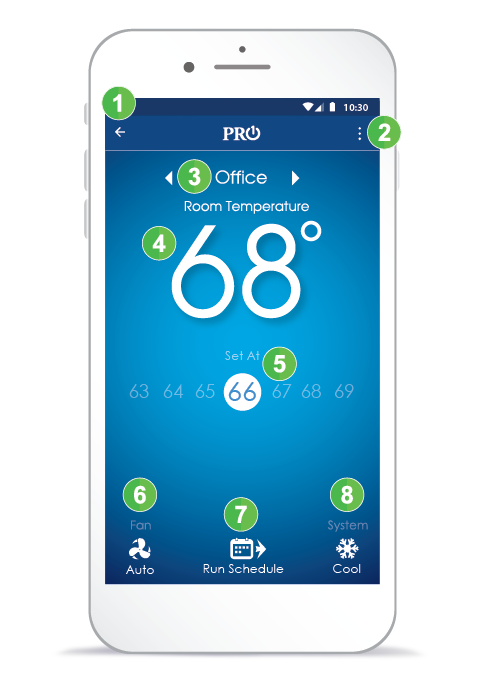
Return back to My Thermostats screen.
Access settings specific to the currently viewed thermostat including scheduling.
Use the left and right arrows to switch between thermostats.
Note: Arrows only appear if you have multiple thermostats installed.
This number displays the current ambient room temperature.
Set the desired temperature of your space using the setpoint slider. The color of the setpoint will change to red in heat or blue in cooling.
Select your preferred fan mode (Auto, On, or IAQ).
Change or view your scheduled program.
Note: Scheduling must be turned on in the thermostat menu.
Select your preferred system mode (Heat, Cool, Off, Auto)
Return to the thermostat control screen.
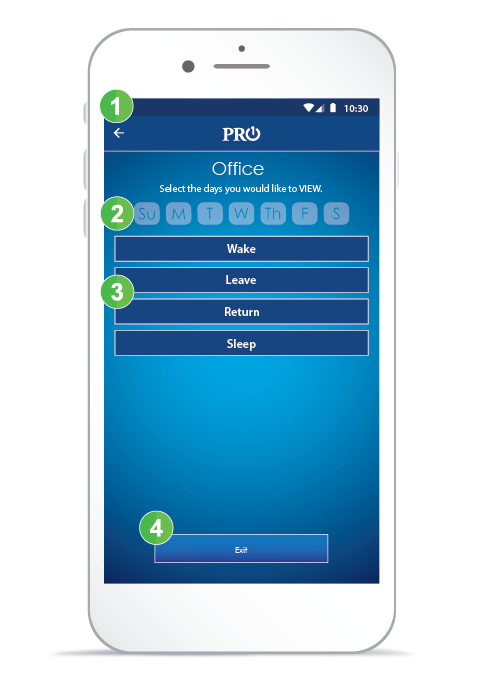
Select the days of the week you want to view or edit.
Select the time period to view its settings.
Exit back to the thermostat control screen.
Note: You must save your changes before exiting.
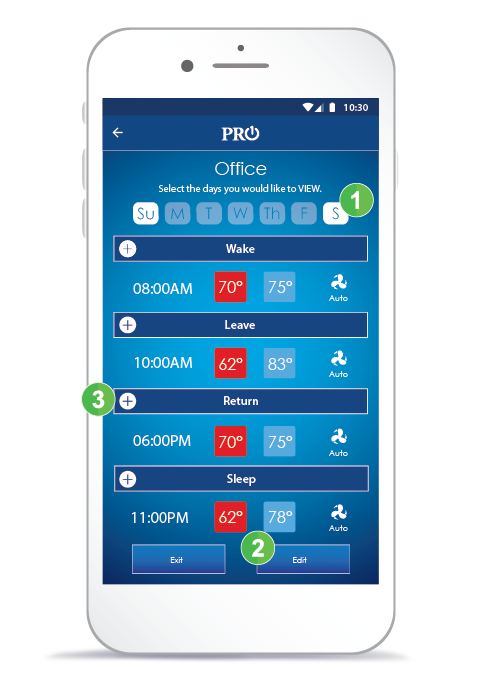
Select a day of the week to view days grouped together
Select the edit button to make changes. This will make the + signs appear.
Select the plus sign to expand the time period you wish to edit.
Note: The T701i is shipped as a non-programmable thermostat. If you would like to use this feature, you must first turn scheduling on through the thermostat menu located in the top right corner of the thermostat home screen.
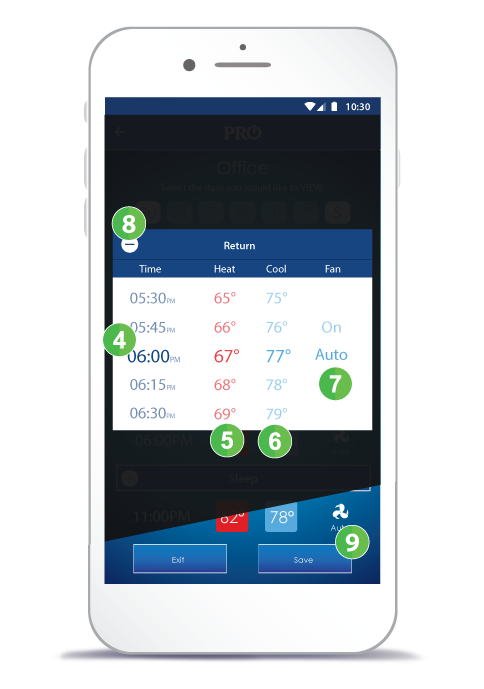
Scroll up or down to select the time you want the time period to begin.
Scroll up or down to select the preferred heat temperature for this time period.
Scroll up or down to select the preferred cool temperature for this time period.
Scroll up or down to select the preferred fan mode.
Press the minus button to return to the schedule home screen.
Press save to apply the changes.
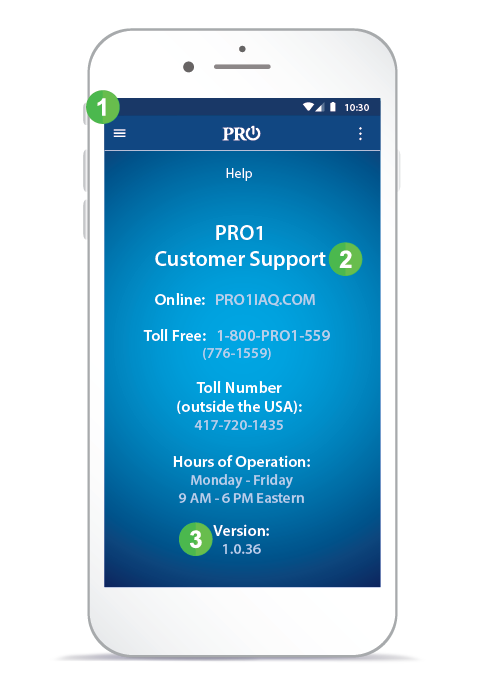
Access Help, Add a Thermostat, and more.
Visit our website for additional self help resources or call our US based customer service team.
This displays the version of the app you are using. Customer service will ask for this when trouble shooting.
(Customer Support may ask for this information.)
On a TP-S-855iSH the TSTAT network should appear in the text field at the bottom of the thermostat screen. If it is not currently showing, hold down the light button for three seconds. If it does not you can manually retrieve it by doing the following:
1. Open the bottom door on the thermostat and press the MENU button.
2. Next press the WIFI button.
3. Now press NEXT twice and your SSID information will show.
On a TP-S-701i the TSTAT network should appear in the clock field on the top left of the thermostat screen. If it is not currently showing, hold down the light button for three seconds. If it still does not show you can manually retrieve it by doing the following:
1. Hold down the + and – buttons together for three seconds.
2. Next press the WIFI button.
3. Now press NEXT twice and your SSID information will show.
If these steps did not work please see “Why don’t I see the TSTAT-#### network on my thermostat?”
You can reset your TP-S-855iSH network by doing the following:
1. Press MENU
2. Next press WIFI
3. Press “Next” until “DELETE NETWORK” is shown
4. Hold “YES” for 3 seconds. Now you have reset your TSTAT network
You can reset your Legacy TP-S-855i (Identified by only 5 buttons under the bottom door) network by doing the following
1. Press MENU
2. Next press WIFI
3. Now hold down TECH for three seconds
4. Press YES. Now you have reset your TSTAT network
You can reset your TP-S-701i network by doing the following:
1. Hold the + and –
2. Press WIFI
3. Hold down “TECH” for 5 seconds
4. Press Yes to reset the network information
The TP-S-855iSH and TP-S-701i TSTAT networks can be activated by holding down the top glow in the dark light button for 3 seconds. This turns on the network for 10 minutes to allow you to connect to the Connect app. If you were previously connected to a different network you may need to reset the network information stored in the thermostat. See: “How do I delete or reset my thermostat’s wifi information?”
Note: for Legacy TP-S-855i (Identified by only 5 buttons under the bottom door). This thermostat automatically attempts to enable the thermostat network on power-up. If it does not appear, you can view the network name in the wifi menu (Press Menu, then Wifi, then Next until the SSID menu is shown.
Some wireless routers have advanced features like guest networks. It is recommended that you connect your thermostat to your home network. If you must connect to your guest network, then you will need to contact the router manufacture to assist in unblocking port 443 in the guest network firewall.
1. Press MENU.
2. Next press WIFI.
3. Now hold down TECH for three seconds.
4. Press YES. Now you have reset your TSTAT network.
Email login, gmail login, and facebook login are each unique login methods – much like creating different accounts with different emails. We did not want to risk associating your login with a similar gmail or facebook account buy guessing that your login email matches the social sign in. Please choose a single sign-in method for your account and always use that same method as long as you keep the account.
This process can take several minutes. Power up your thermostat before your app, it may help to not be right next to your thermostat during this step. If it does not show, verify that the thermostat is broadcasting its network. When active, it will display the network in the display’s text field.
You must first connect to the thermostat’s internal WIFI network to connect it to our server. Please use your wifi settings to connect to the thermostats network (its SSID will be TSTAT-####) before pressing Continue.
Our server communicates on ports 1883, 8883, and 443. Please make sure your router or firewall is not blocking traffic to those ports.
Please make sure the thermostat is installed in a location with strong wifi signal strength and your wifi router has a good connection to the internet. If your thermostat shows a strong wifi signal strength icon, and a connected “link” icon, and your app reports the thermostat has connected within the past few minutes, you may be experiencing a known issue on our system. We are working on a fix to reduce these false offline messages.
If you are connecting a thermostat that is over a year old for the first time, it may update before you see it in the app. Our older thermostats previously communicated to a different app. This update allows it to talk to the new app.
In order to experience our product’s full potential, they must be installed by a professional heating and cooling technician.